 Picture Object Properties
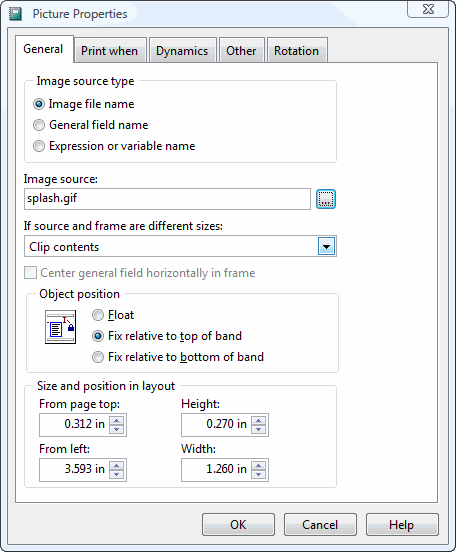
The General page of the Picture Properties dialog has the following options:
Image source type: the type of source for the image. Image file name means the Image source setting (discussed next) contains the path and name of an image file. General field name is there for backward compatibility and isn't required anymore. Expression or variable name means Image source contains the name of a field or some other expression that contains either the path and name of an image file (that is, the name of an image file on disk is stored in a field in the database) or the image itself (that is, the image is contained in a field in the database).
Image source: the source for the image. If Image source type is set to Image file name, enter the name and path for the image file. Otherwise, enter the "real" table and field name (for example, "CUSTOMER.IMAGE") for Image source. Alternatively, you can bring up the Expression Builder and select the desired field there.
If source and frame are different sizes: this setting determines what to do if the image source is a different size that the frame you created for the picture. The choices are:
Clip contents: show a section of the original picture in the frame, retaining the picture's original dimensions if the picture is bigger than the frame. The picture is anchored at the top and at the left of the frame. You cannot see the lower-right portion of the picture that extends beyond the frame.
Scale contents, retain shape: displays the whole picture, filling as much of the frame as possible while retaining the relative proportions of the picture. This protects your picture from vertical or horizontal distortion.
Scale contents, fill the frame: displays the whole picture, filling the frame completely. If necessary, the picture is distorted vertically or horizontally to fit the frame.
Center general field horizontally in frame: as its name suggests, turning this setting on centers the picture horizontally within the frame. This setting is not available if Image source type is set to Image file name.
Object position: it's possible the height of a band can change when it's printed. For example, the detail band may only appear as one line high in the Advanced Report Designer, but if a field's Stretch with overflow setting is turned on (see Field Object Properties), that field may take more than one line if it contains a lot of information, and therefore so does the detail band. The object position settings allow you to specify what happens to objects when the band they're in changes height. The choices are:
Float: specifies that the selected object moves vertically relative to the size of objects directly above it.
Fix relative to top of band: as the band changes height, this object maintains its position relative to the top of the band.
Fix relative to bottom of band: as the band changes height, this object maintains its position relative to the bottom of the band.
Size and position in layout: rather than trying to precisely size or position an object using the mouse or arrow keys, you can specify the dimensions and location of the object using these controls.
When an object is added to the report, the values for From page top, From left, Height, and Width are set automatically. From page top is relative to the top of the page in the Advanced Report Designer; it takes into account the height of any grey bars above the object. Changing From page top may move the object to another band.
From page top and Height determine whether absolute positioning or relative positioning is used. When From page top is a value that falls within the Advanced Report Designer surface and Height is less than or equal the height of the band the object is in, relative positioning is used. When From page top is a value that falls outside the Advanced Report Designer surface or Height is greater than the height of the band the object is in, absolute positioning is used. Absolute positioning means the object is printed in exactly the same location on every page. Relative positioning is needed for objects in bands other than the Page Header and Page Footer.
Absolute positioning can be used to create a watermark on a report. Place a graphic image in the Page Header band and set If source and frame are different sizes to Scale contents, retain shape. Change From page top and From left to the upper-left corner of where you want the watermark to begin. Change Height and Width to the overall size of the watermark, making sure not to extend beyond the printable margins of the printer. Note that if you want the watermark to appear on top of the content for the report, put "FOREGROUND" into the Comment setting on the Other page (discussed below).

The Print When page allows you to conditionally print an object so it can be ignored under some conditions. This page has the following options:
Print repeated values: setting this to No means the object won't print unless one or both of the In first whole band of a new page/column and When band content overflows to new page/column settings are turned on.
In first whole band of a new page/column: prints the object in the first band of a new page or column that isn't an overflow from a previous page or column. This option is automatically turned on (and disabled) if you choose Yes for Print repeated values, and optional if you choose No for Print repeated values.
When this data group expression changes: prints the object when the value of the chosen group changes. This option is available only if a group exists and Print repeated values is No. Choose a group from the list beside this option.
When band content overflows to new page/column: prints the object when the band overflows to a new page or column. This option is available only if Print repeated values is No.
Remove line if blank: removes the entire line of the report the object is on if the object is blank and no other object is on the same line.
Print only when expression is true: an expression to be evaluated before the object prints. If the expression is true, the object is printed; otherwise, it isn't printed. All other options in this dialog except Remove line if blank are disabled if you include an expression. Click the Expression Builder button to display the Expression Builder.
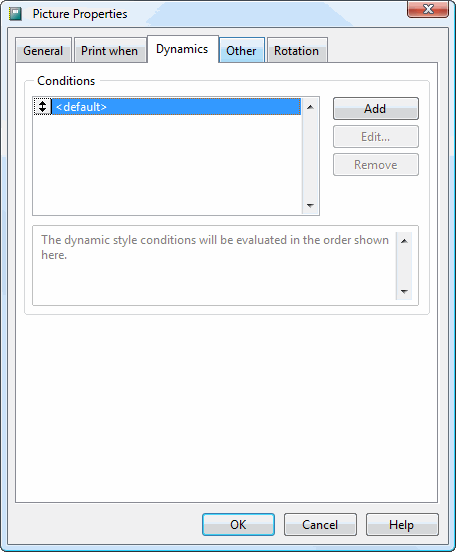
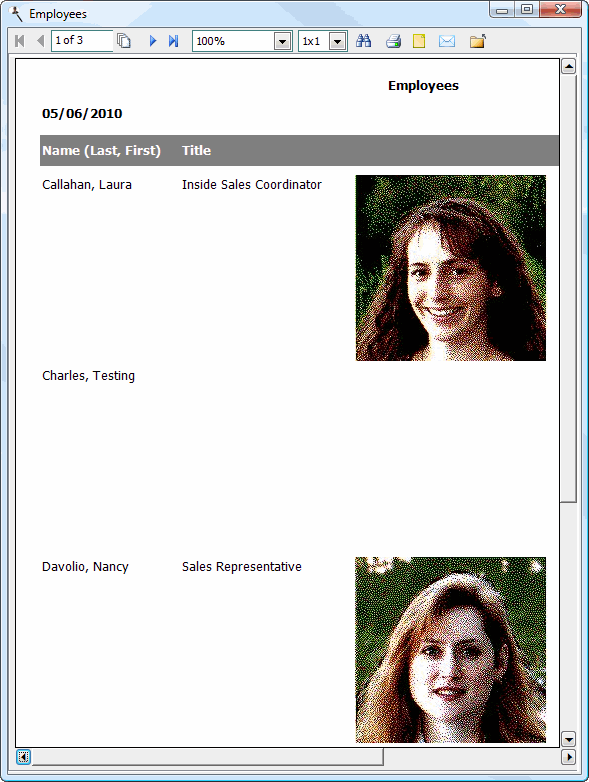
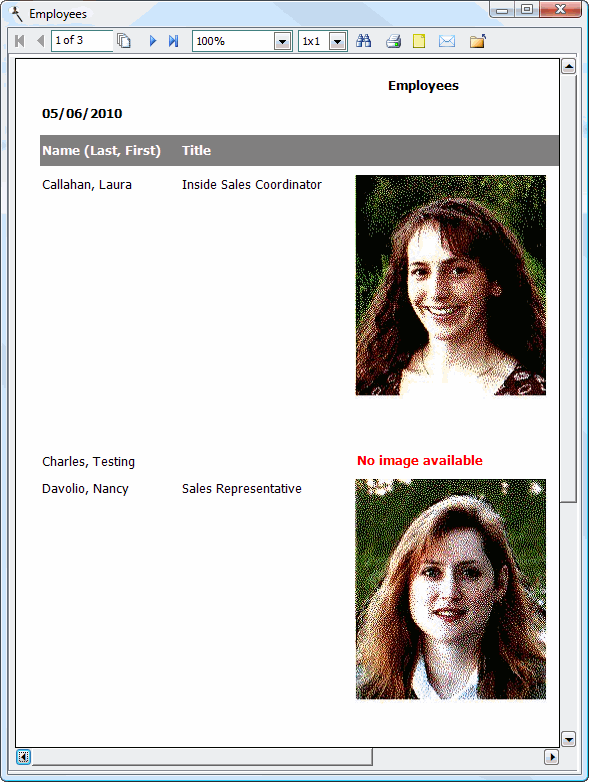
The Dynamics page allows you to change the way the image appears in the report depending on certain conditions. One use of this is when you have image objects in the detail band of a report, but not all records have images. While you can suppress the missing images using the Print only when expression is true setting in the Print When page (such as "not empty(Photo)"), the band is still sized large enough for the image so there's a lot of blank space between detail records as you can see in this image:
Dynamics can help with this as you'll see in the example later. Note that using dynamic settings significantly increases report generation time, so use it only when required.
The Conditions list shows the conditions you've defined. To add a new condition, click the Add button. Enter the name of the condition and click OK. The following dialog appears.
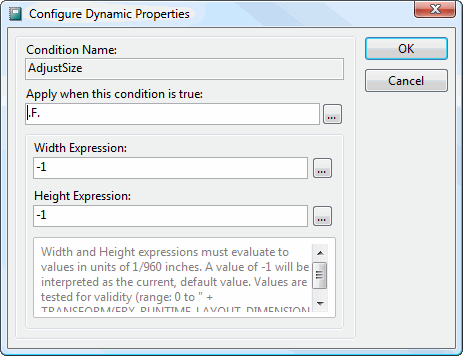
This dialog has the following options:
Condition Name: the name you assigned to the condition.
Apply when this condition is true: the condition that affects the field. You can enter the expression for the condition or click the button with the ellipsis (...) to display the Expression Builder. For example, entering "TotalPrice < 0" means this condition is used whenever the total price is negative.
Width Expression: enter a value or click the button to display the Expression Builder to specify a width to use when the condition is true. The width must be specified in inches or centimeters, depending on how your system is configured. The default of -1 means use the width already defined for the object.
Height Expression: enter a value or click the button to display the Expression Builder to specify a height to use when the condition is true. The height must be specified in inches or centimeters, depending on how your system is configured. The default of -1 means use the height already defined for the object.
Click the Edit button to display the same dialog shown above to edit the condition settings or Remove to remove the condition. You can also change the order in which conditions are applied by clicking the button in front of the condition name in the list and dragging up or down.
One of the uses of dynamics is to suppress the wasted space of missing images. To do this, define the image with a very small width and height and size the detail band so it's only as tall as needed. Create a dynamic condition with a condition expression that is only true when the image exists (for example, "NOT EMPTY(ImageFieldName)") and specify the desired setting for Width and Height. When the report runs, if the condition evaluates to true (meaning there is an image for the current record), Stonefield Query expands the size of the image and the detail band as well. As a result, because the defined height of the detail band is shorter due to the initial small size of the image, there's no wasted space when the image isn't output. This example image also has a label with the opposite Print When expression ("EMPTY(ImageFieldName)") so it displays in place of missing photos:
Note that Object position must be set to Float for this to work. If it's set to Fix relative to top of band or Fix relative to bottom of band, the dynamic condition is ignored.

The Other page displays a comment about the object. To change the comment, click the Edit comment button.
The Rotation page allows you to rotate an object on the report by specifying the rotation angle as a clockwise value (for example, an angle of 90 rotates the object 90 degrees clockwise). A representation of the rotation is shown so you can tell whether you have the desired angle. Note the object doesn't appear rotated in the Advanced Report Designer, but only when the report is run. Also note that using rotation significantly increases report generation time, so use it only when required.
© Stonefield Software Inc., 2025 • Updated: 09/28/16
Comment or report problem with topic