 Creating Your Own Formulas
You may wish to add your own formulas to a report. For example, suppose you pay commissions of 5% of the sales amount. You could output a report showing sales amounts to a Microsoft Excel document and then add a formula that calculates 5% of the amount, but it would be easier and more convenient to do it in Stonefield Query. Although you can do this by using the Advanced Report Designer or customizing the data dictionary, it's much easier to do it by defining your own formulas.
You must have an Ultimate license to create and edit formulas.
There are two types of formulas: normal and grouping. A normal formula is one that calculates a value by evaluating an expression on each record. For example, a formula that calculates a 5% commission would have an expression something like "Amount * 0.05" and it would calculate that value for every record in the result set for a report.
A grouping formula is more complicated. It calculates a value but it goes through a set of records, often from a different table than the formula goes in, matching a filter and performing a summarization. For example, suppose you want columns in a report that show the sales for last year and the current year-to-date for each customer. Those aren't single values retrieved from the database. Instead, for the first column, use a grouping formula that sums up the sales records for each customer for last year, and use a similar one but for the current year for the second column.
Another use of a grouping formula is to determine the oldest or newest date, such as the most recent invoice date or the first appointment date.
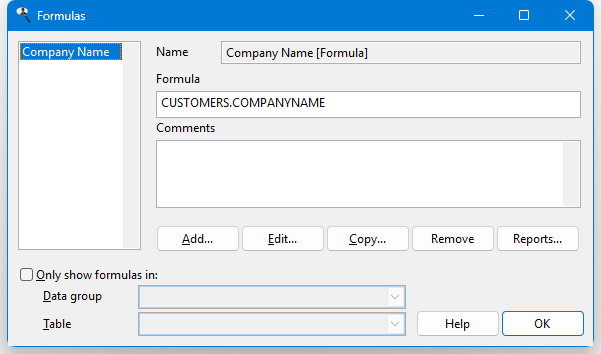
To create your own formulas, click the Formula button in Step 2 of the report wizards or choose Formulas from the Tools menu and click Add in the Formulas dialog to bring up the Formula Editor.
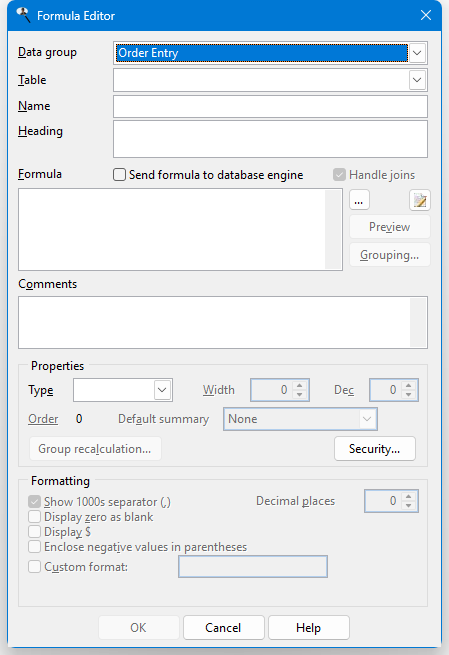
The Formula Editor has the following options:
Data group: the module to select a table from. Only those modules installed on your system and you have rights to appear. Choose "All" to select any tables for the formula, regardless of module. This item is disabled when you edit an existing formula.
Table: the table the formula appears in. This is normally filled in automatically after you've entered the formula, but you can change it if necessary. This item is disabled when you edit an existing formula; if you need to store the formula in a different table, you have to delete the formula and recreate it in the correct table.
Name: the name to give the formula, such as "Commission Amount."
Heading: the default column heading for the formula. This is normally the same as Name but could be different, such as an abbreviation ("Comm. Amt."). You can specify multiple lines for the heading by pressing Enter where a new line should start.
Send formula to database engine: turn this on if the database engine evaluates the formula or off if Stonefield Query requests any fields used in the formula from the database engine and then evaluates the formula itself. This should be turned off if you use any Stonefield Query expressions or functions that the database engine doesn't understand, such as the functions listed in the Function Reference.
Handle joins: turn this setting, which is only available if Send formula to database engine is turned on, off if you don't want the expression to affect the joins in the SQL statement created for a report using this formula. For example, if the formula uses a subquery involving another table that isn't related to the table for the formula, you'll get a warning that's there no relationship between the tables when you test the expression or use it in a report. In that case, turn off Handle joins so the tables referenced in the formula aren't automatically added to the FROM clause of the SQL statement.
Formula: the formula for the calculation. You can type the formula if you wish, but it's much easier to use the Expression Builder instead; click the button beside the formula box to bring up the Expression Builder. Note that formulas are displayed using real table and field names, another reason why it's easier to edit them using the Expression Builder. Here's an example of an expression that calculates 5% of the sales amount:
Transaction.Amount * 0.05After you enter the formula, you're asked if it should be tested to make sure it's valid. If you choose Yes, this may take a moment if the database is large. If you choose No, you cannot save the formula until Type has been specified, which you have to do manually.
If the formula performs division and it doesn't check for the denominator possibly being zero, you'll get a warning message about that. For example, if your formula is UnitPrice/TotalPrice, you'll get a "division by zero" error for any records that have a TotalPrice of 0. Use the IIF() function to check for that case and give 0 instead: IIF(TotalPrice = 0, 0, UnitPrice/TotalPrice). See the Function Reference for details on the IIF() function.
To create a formula that is treated as a formula in Microsoft Excel, start it with an equals sign and enclose it in parentheses. If desired, use "{ROW}" as the current row and "{COL}" as the current column. For example, =(LEFT(A{ROW}, 5)) creates a formula that results in the first five characters of column A in the current row.
Edit custom function (
 ): click this button to edit a custom function used in the formula. There are a couple of ways you can specify the custom function. First, if the formula starts with a custom function name, such as "MyCustomFunction(some value)," that name is automatically used. Second, select the text containing the name of the custom function to specify that function. When you click this button, if the custom function does not exists, you're prompted if you want to create it. If you choose Yes or if the function already exists, a code editing window appears in which you can enter the code for the function. Custom functions are stored in the Data\Functions folder under the Stonefield Query program folder.
Preview: click this button, which is only available after you've entered a valid formula, to see the results of your formula for the first ten records in the table. This helps you determine if you've used the correct formula.
Grouping: click this button to display the Grouping Formula Properties dialog, discussed below.
Comments: enter any comments you want displayed in the Comments page of the Field Properties dialog.
Type: the data type for the formula's result. This is normally filled in automatically after you've entered the formula, but you can change it if necessary.
Width: the size of the formula's result. This is normally filled in automatically after you've entered the formula, but you can change it if necessary.
Dec: the number of decimal places in the formula's result. This is normally filled in automatically after you've entered the formula, but you can change it if necessary.
Order: the order of the formula in the table. Normally you won't change this value but if you want the formula to appear somewhere other than at the end of the list of fields when fields are displayed in table order, click the Order link to display the following dialog:
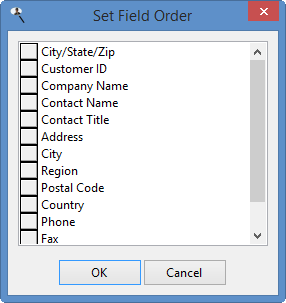
To move a field up or down in the list, click the button in front of its name and drag up or down.
Note that this option is only available when you edit an existing formula rather than add a new one.
Default summary: this setting specifies the default summary setting for the formula in a report. For example, if this is set to Sum, when the formula is added to a report, Stonefield Query automatically sums it. This is only enabled for numeric formulas. An additional choice, Group Calculation, is displayed if the formula's value is recalculated at the group level (discussed below) is turned on.
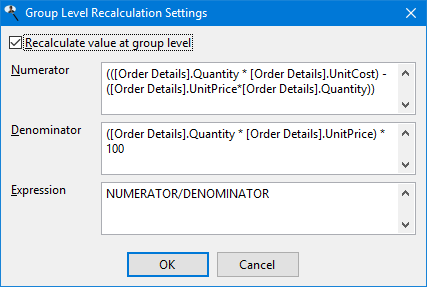
Group recalculation: some types of formulas can't use the normal types of summary settings, such as Sum or Average. For example, you can create a formula to calculate the margin of an item using something like "(SaleAmount - Cost)/SaleAmount * 100." That expression works correctly for detail items but not for groups. Suppose an invoice has one item sold for $2.00 that you paid $1.00 for (a 50% margin) and another item for $20.00 that you paid $15.00 for (a 25% margin). The total sale amount for the invoice is $22.00 and the total cost of the items is $16.00 for an overall margin of 27%. For a group footer for that invoice, you clearly can't sum the margins (25 + 50 = 75%), nor can you average them ((25 + 50)/2 = 37.5%). What you really need the report to do is to total the sales amounts, total the cost amounts, and then calculate the margin at the group level from those totals. This option allows you to do that. Click this button to display the Group Level Recalculation Settings dialog. This button is disabled unless the expression has a "/" (that is, it does division).
The options in this dialog are:
Recalculate value at group level: turn this on to enable the other controls.
Numerator: fill in the expression used to calculate the numerator of the formula. The default is everything in the expression up to the division sign ("/") but you can change it as necessary. If you specify another formula as the numerator, it's automatically expanded to the expression for that formula.
Denominator: fill in the expression used to calculate the denominator of the formula. The default is everything in the expression after to the division sign ("/") but you can change it as necessary. For example, if the formula expression is "(SaleAmount - Cost)/SaleAmount * 100," the default denominator is "SaleAmount * 100", which isn't really what you want. Instead change it to "SaleAmount." If you specify another formula as the denominator, it's automatically expanded to the expression for that formula.
Expression: fill in the expression to calculate at the group level. The default is "NUMERATOR/DENOMINATOR"; "NUMERATOR" is a placeholder for the numerator expression and "DENOMINATOR" is a placeholder for the denominator expression. However, you can change the expression as necessary. For example, if the formula expression is "(SaleAmount - Cost)/SaleAmount * 100," change the expression to "NUMERATOR/DENOMINATOR * 100."
Don't use an expression like IIF(DENOMINATOR = 0, 0, NUMERATOR/DENOMINATOR) because it isn't needed; the calculation code already checks for the denominator being zero.
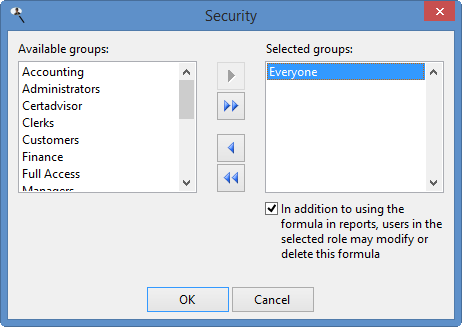
Security: click this button to specify security for the formula.
The options in this dialog are:
Available groups: this shows which user groups do not have access to this formula. This means users in those groups cannot see it in the Formulas list nor can they see it when they create or edit a report; it's as if the formulas doesn't exist for them.
Selected groups: this shows which user groups have access to this formula. By default, the Everyone group has access to a new formula, so all users can see it. If you want only certain users to see it, remove the Everyone group from the Selected list and add the appropriate groups from the Available list. If no groups have access to the formula, the formula is essentially private, available only to you.
Add: clicking this button adds the selected group in the Available list to the Selected list. You can select several groups by holding down the Ctrl key as you select them; clicking Add adds all selected groups to the Selected list. You can also add the group by double-clicking it in the Available list, selecting it and pressing Enter, or dragging the group from the Available list to the Selected list. The group is removed from the Available list.
Add all: clicking this button adds all groups from the Available list to the Selected list.
Remove: clicking this button removes the selected group (or groups if you have selected more than one) from the Selected list. You can also remove the group by dragging it from the Selected list to the Available list. The group is added to the Available list.
Remove all: clicking this button removes all groups from the Selected list, and adds them to the Available list.
In addition to using the formula in reports, users in the selected group may modify or delete this formula: turn this option on if the selected group in the Selected list can edit or delete this formula; if this item is turned off, only you are able to do so.
Show 1000 separator: if this option is turned on, the data in the field is formatted with the thousands separator defined in the Regional Settings applet of the Windows Control Panel. This option is only available for numeric values.
Display zero as blank: if this option is turned on, a blank is displayed rather than a zero value. This option is only available for numeric values.
Display $ (the appropriate currency symbol for your system is displayed in place of "$"): turning this option on displays the currency symbol defined in the Regional Settings applet of the Windows Control Panel in front of the field's value. This option is only available for numeric values.
Enclose negative values in parentheses: turn this option on to display negative numbers in parentheses rather than with a minus sign; for example, (123.45) instead of -123.45. This option is only available for numeric values.
Display date only: turning this option on displays only the date portion of the field's value. This option is only available for date/time values.
Display empty date as blank: if this option is turned on, a blank is displayed rather than " / / " for blank dates. This option is only available for date/time values.
Decimal places: the number of decimals to display for numeric values.
Custom format: turn this option on if you want to specify your own custom format, and enter the format in the next box.
For numeric values, use "9" as a placeholder for digits, "," to indicate where the thousand separators should go, and "." to indicate where the decimal separator should go. Use "$" as the first character to specify that a currency symbol should be displayed. For example, 12345.6789 is displayed as $12,345.68 if you use "$999,999,999.99" as the format. You can also add "Z" to the start of the format to display zero as blank.
For date/time values, use "Z" to display a blank date/time as blank rather than " / / ". You can also use "D" to display the date and time of a date/time value (although this can be turned off in the Field Properties dialog). If this isn't specified, Stonefield Query displays only the date portion of a date/time value by default.
Sample: shows a sample of how date and numeric values are formatted.
To create a grouping formula, click the Grouping button to display the Grouping Formula Properties dialog and enter the desired settings.
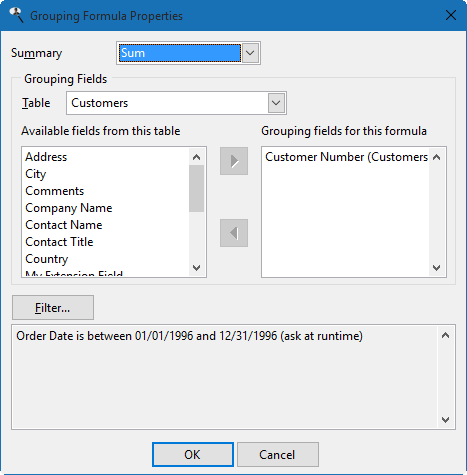
The settings are:
Summary: the type of summarization to do for the grouping formula: Sum, Average, Highest, Lowest, Count, Count Distinct, or Combine. The difference between Count and Count Distinct is that Count counts the number of records while Count Distinct counts the number of records having unique values on this field. For example, if there are 100 order records but all orders were placed this week, using Count on the Order Date field would display 100 but Count Distinct would display 7 (assuming at least one order was placed every day this week).
Combine is used for text fields when you want to combine the values of several records into a single, comma-separated value in one record. For example, suppose you want to show which products each customer purchased. If you add the customer name and product name to the report, you'll see one record for every purchase a customer made, so there may be many records for each customer. If you only want each customer to appear once, create a grouping formula in the customers table with an expression of the product name, Summary set to Combine, and customer number as a Grouping field. Now, when you add company name and this formula to the report, you'll see each customer just once with a list of the products they purchased.
Highest and Lowest are useful for determining the newest or oldest date. For example, selecting Invoice Date for the expression of the formula and setting Summary to Highest gives the date of the most recent invoice.
Choose the desired function from the drop-down list, or "None" for no summary value, meaning this isn't a grouping formula.
Grouping Fields: choose the fields to group the values on. The controls work the same as they do in step 2 of the report wizards: select the table from the Table drop-down list, select the desired field in the Available list, and click the Add button to move it to the Grouping fields list.
Filter: click this button to display the Filter dialog for grouping formula. The filter conditions can have Ask at runtime turned on so the user is prompted for the values to use. If you want to use a date range for the formula that's the same as that for the report (that is, the report has a filter condition on a date field and you want the same date range used for the formula) without being prompted, set Compare To for the filter condition to Expression and use the GetConditionValue function.
For example, suppose the formula calculates last year's sales for each customer. In that case, the formula would go in the Customers table and the expression would be the Amount field from the Orders table. Summary would be "Sum", Grouping field would be Customer ID, and the filter condition would be on the Order Date field, use the is between operator, have Compare To set to Expression and use as the two values "Date(Year(Date()) - 1, 1, 1)" and "Date(Year(Date()) - 1, 12, 31)". The first expression gives January 1 of the previous year: the Date() function gives the current date, Year(SomeDate) gives the year of the specified date, subtracting 1 from the year gives the previous year, and Date(Year, Month, Day) gives January 1 of that year. The second expression is similar but gives December 31 of the previous year.
The OK button for the Grouping Formula Properties dialog is only enabled if Summary is "None" or you've selected a grouping field. Click OK to save the grouping formula settings.
The OK button for the Formula Editor is only enabled after you have entered a formula and the Table, Name, Type, and Width settings are filled in. Click OK to save the formula and close the Formula Editor. Note that any formula you create is automatically added to the report so it appears in Selected Fields list.
To see all of the formulas you've defined, choose Formulas from the Tools menu.
This dialog shows a list of the formulas you've defined at the left and information about the selected formula at the right. To add a new formula, click Add. To edit the selected formula, click Edit. Click Copy to copy the selected formula to a new one and edit that formula. The Remove button removes the selected formula; you can also press the Delete key to remove the formula. Note that if the formula has security and you're not in a user group with permission to edit or delete the formula, the Edit and Remove buttons are disabled.
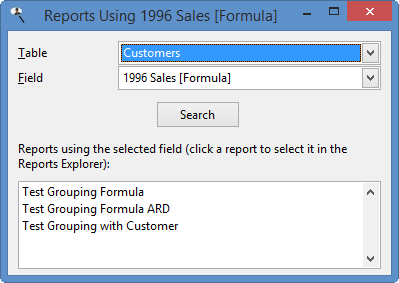
Click the Reports button to see a list of the report using the selected formula. This is handy if you're thinking about removing a formula but want to know whether it's being used first. Clicking a report in the list selects it in the Reports Explorer, allowing you, for example, to edit the report to see how the formula is used.
If you have a lot of formulas, it may be hard to find the one you're interested in. You can filter the list to display only those formulas in a specific table or data group. Turn on Only show formulas in and select the desired data group to display only formulas in tables belonging to that data group or a table to show only formulas in that table. Turn Only show formulas in off to restore the list to all formulas.
© Stonefield Software Inc., 2025 • Updated: 05/22/25
Comment or report problem with topic