 Importing and Exporting Reports
If you want to send report layouts to or receive report layouts from other users, use the Import or Export functions.
Importing Reports
To add a report someone else created to your list of reports, choose the Import Reports function from the File menu, click the Import button in the Home tab of the ribbon, or choose Import Reports from the shortcut menu. Stonefield Query displays a dialog from which you can select an SFX (Stonefield Query import file) or SFQ (older format import file) file to import. You can also import Crystal reports (RPT files) or Visual FoxPro reports (FRX files) by choosing the desired type from the Files of type option. To import several reports at the same time, select the first file to import, then hold down the Ctrl key as you select the other files. SFX or SFQ files are imported when you click the Open button. In the case of RPT or FRX files, the New External Report Wizard appears for each file so you can specify information about the report.
Here are some notes about importing reports:
If the report you're importing has the same name as an existing report (for example, the person sending you the report made some changes to it), you're prompted if you want to replace the existing report with the one being imported. If you choose Yes, the existing report is replaced. If you choose No, the imported report is given a new name, usually with "1" added as a suffix. Choosing Yes to All when importing multiple reports means you won't be prompted again and all imported reports replace existing ones with the same name.
If the report you're importing contains a formula with the same name as one you have but is different than your copy (for example, the person sending you the report edited the formula's expression), you're prompted if you want to replace your formula with the one in the report. You normally should choose Yes unless you know that your copy of the formula is more current.
If you import a report using a folder that has the same name as an existing folder but a different structure (for example, you have a folder named Daily Reports that's inside the Management Reports folder and the imported report belongs in a folder also named Daily Reports but that's inside the My Reports folder), you're prompted if you want the report to go into the folder that's on your system (continuing this example, the Daily Reports that's inside the Management Reports folder).
After the importing process is finished, the reports appear in the Reports Explorer unless they belong to a folder you don't have rights to, in which case only users with rights to that folder see those reports.
Exporting Reports
A fast way to email a report file to someone is to right-click the report in the Reports Explorer and choose Email Report File from the shortcut menu. Enter the email address of the person to send it to and click Send.
Alternatively, select the Export Selected Report function in the File menu, click the Export button in the ribbon and choose Export Selected Report from the dropdown menu, or right-click the report and choose Export Selected Report from the shortcut menu. When prompted, enter the name of the export file to create; the file name defaults to the report name. It is automatically given an SFX extension. You can then send this file to someone else (for example, by attaching it to an email message) and they can use the Import function to add it to their list of reports.
To export a set of certain reports, select the Export Reports function in the File menu, click the Export button in the ribbon and choose Export Reports from the dropdown menu, or choose Export Reports from the shortcut menu. The Export Reports dialog appears.
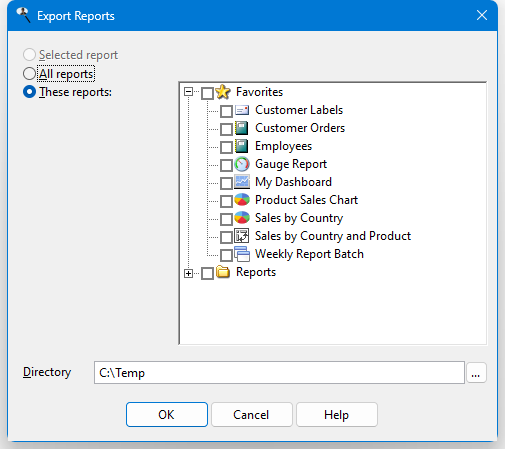
The options in this dialog are:
Selected report: exports the selected report (the name of the selected report is shown).
All reports: exports all reports.
These reports: choose this item to indicate that you will select certain reports. The list of reports at the right is then enabled, allowing you to select which reports to export by turning on the checkmark in front of the desired report names. To select all of the reports in a folder, turn on the checkmark in front of the folder name; turning the checkmark off deselects all of the reports in the folder.
Directory: the directory to create the export files in. The files will be named the same as each report with a SFX extension.
Click OK to begin the export process or Cancel to close the dialog without exporting.
If an advanced layout report has any images, such as a company logo, those images are included in the SFX file for the report. If you export the report and send the SFX file to someone but forget to send them the image files used by the report, the Import process they use to add the report to their reports list creates a new folder called Images and puts the images imbedded in the SFX file there.
© Stonefield Software Inc., 2025 • Updated: 09/24/22
Comment or report problem with topic